Design
Components
The Critical Stack UI depends on the following components, which are deployed:
- Kubernetes CRDs for users, applications, and dex configuration
- Services and Deployments for each of:
- UI
- Runs controllers
- Serves client pages
- Proxies Kubernetes API requests & WebSocket connections
- Proxies Dex traffic
- Dex
- See the SSO integration docs
- marketplace
- UI
In addition, existing services within the cluster are utilized when available:
- Prometheus (metrics collection/aggregation)
- StackApps CRDs (see docs)
Kubernetes API
All interactions with the Kubernetes API (creating and modifying resources, for example) are performed by the UI deployment's Service Account on behalf of the acting user. The service account impersonates the user (and any groups they may belong to) in order to properly scope the permissions (see RBAC below) of the user's session.
Note: because the UI is able to be used for cluster management (by a user with the appropriate role), the service
account in use has elevated permissions - by default a binding to the ClusterRole cluster-admin. As with any privileged tool, this means
that appropriate care should be taken when deploying and exposing the UI.
Most requests to the Kubernetes API server are proxied through a generic /resources endpoint which will apply the
appropriate impersonation information, validate inputs, and format the output for use by the frontend client.
In order to provide streaming logs, resource watches, and container shells, the UI server also proxies WebSocket connections. If you are experiencing issues with these features, there may be a problem establishing the websocket connection (commonly a load balancer is not configured appropriately) - see the FAQ for more info.
RBAC
Because all user-initiated interactions with the Kubernetes cluster utilize impersonation (see above), authorization for requests is effectively delegated to the Kubernetes API server. This has several benefits:
- Permissions will always be consistent between the UI and direct interaction (i.e.
kubectl) - User abilities can be controlled via declarative resources (Roles and RoleBindings) fully compatible with the Kubertentes ecosystem
- The surface area for vulnerabilities to be created/exploited is substantially smaller
The core Kubernetes RBAC model refers to users "lazily", only as the subjects of bindings. These users do not (necessarily) correspond to any sort of existing resource, it is up to the authentication service (in this case, Dex) to declare and keep track of these entities (the same is true of Groups).
The Critical Stack UI introduces a Custom Resource Definition for a cluster-level User resource to the Kubernetes API:
$ kubectl get users
NAME                                                              EMAIL                   ACTIVE   USERNAME                  AGE
sy3e5vknpktgkezpehh3rv76v5helr6vgnrm26feoz67stsosg6ef4jbdb2uegk   dev@criticalstack.com   true     "Cluster Administrator"   2d22h
These users correspond with subjects in rolebindings by their associated email address. Note that the resource name is obtained as a hash of the user's email in order to meet naming requirements. This ensures that only one user may exist in the cluster with a given email address.
The above user may be granted a role by creating the following RoleBinding:
apiVersion: rbac.authorization.k8s.io/v1
kind: RoleBinding
metadata:
  name: my-admin-role-binding
  namespace: default
roleRef:
  apiGroup: rbac.authorization.k8s.io
  kind: Role
  name: my-role
subjects:
- kind: User
  name: "dev@criticalstack.com"
  apiGroup: rbac.authorization.k8s.io
Users have groups, at a minimum system:authenticated with others returned by Dex depending on SSO provider. The
groups correspond with Groups in bindings:
# ...
subjects:
- kind: Group
  name: "frontend-admins"
  apiGroup: rbac.authorization.k8s.io
See user management for more information about the use of User resources.
Dex
Dex is an authentication "portal" which uses connectors to integrate with a variety of upstream identity providers.
By configuring the Kubernetes API server to use Dex as an OIDC provider, your
cluster can be setup to trust the tokens Dex issues to authenticated users. The CS UI provides a convenient method for
retrieving a token from Dex and downloading it in a kubeconfig:
In the configuration deployed by the UI helm chart the UI server acts as a proxy for all traffic to Dex -
requests to the cs-ui service with paths beginning /dex/ are proxied to the cs-ui-dex Kubernetes service. This
serves several purposes:
- The Dex service does not need to be directly exposed to external traffic
- The Kubernetes API Server uses the UI endpoint as its OIDC issuer, which is assumed to already have a trusted SSL certificate for end-users
- CS UI acts as a builtin
authproxyconnector for Dex, allowing non-SSO ("local") users to generate Dex tokens
Note: by default, Dex serves traffic over HTTP. If HTTPS communication between the UI deployment and Dex service is desired, additional configuration is required.
Installation
Deploy the included Helm chart to your Kubernetes cluster:
helm upgrade --install cs ./chart \
  --create-namespace \
  --namespace critical-stack
Don't have a cluster handy? Check out cinder 🔥!
The default chart installation depends on Cert Manager being installed to
generate certificates. If you'd rather skip this, pass --set tls.enabled=false to Helm.
Visit the UI service endpoint:
$ kubectl get service -n critical-stack cs-ui
NAME    TYPE       CLUSTER-IP      EXTERNAL-IP   PORT(S)          AGE
cs-ui   NodePort   10.254.244.88   <none>        8000:30000/TCP   12s
Developing Locally
Skip to the tl;dr?
The Critical Stack UI is best developed with cinder and tilt:
git clone github.com/criticalstack/ui
Note: If you clone the repo into a directory within $GOPATH, make sure that
you have $GO111MODULE set to on.
Requirements
- Go 1.14+: to build server code
- NodeJS and NPM: to build client code
- Docker: for local testing and to build container images
- kubectl: for local testing; see the installation guide
- Helm 3: see the installation guide
Cinder
Run the following to install cinder and setup a local development cluster:
make cinder
The required version of cinder will be installed to hack/tools/bin/cinder.
Note: if you would like to provide a different binary, you may set the CINDER variable when calling make:
CINDER=/usr/local/bin/cinder make cinder
The configuration file used by make cinder is hack/cinder.yaml, and the created cluster will be named ui-dev.
Cinder is deployed with the LocalRegistry feature gate enabled, allowing rapid iteration when building container images locally.
In addition, machine-api and machine-api-provider-docker are installed, allowing you to deploy additional worker nodes to your local cluster as Docker containers.
Get Tilt(ed)
curl -fsSL https://raw.githubusercontent.com/tilt-dev/tilt/master/scripts/install.sh | bash
Note: this will not run on older versions of tilt, make sure to have >= v0.15.0.
Now you're ready to run:
tilt up
Log In
Once Tilt has finished installing resources, you can log in to the UI. By default, the Kubernetes Service attached
to the UI deployment listens on nodePort: 30000, meaning it is accessible at http://$(cinder get ip --name ui-dev):30000.
For convenience, cinder is configured with:
extraPortMappings:
- listenAddress: 0.0.0.0
  hostPort: 8000
  containerPort: 30000
  protocol: TCP
So that you can reach the UI by pointing your browser at http://localhost:8000.
The chart values do not specify a default user, but the Tiltfile does for the purpose of local
development. The email address is dev@criticalstack.com, and the initial password is admin. See
configuration for more detail on changing initial credentials.
tl;dr
It really wasn't that much, but ok.
First time setup:
# install helm
curl https://raw.githubusercontent.com/helm/helm/master/scripts/get-helm-3 | bash
# install tilt
curl -fsSL https://raw.githubusercontent.com/tilt-dev/tilt/master/scripts/install.sh | bash
Setup your local cluster & start tilt
make cinder
tilt up
Click http://localhost:8000. Log in with email dev@criticalstack.com and password admin.
Configuration
- configuring chart for deployment
- configuring local setup with tilt
- initial users (link to user management)
- initial sso connectors (link)
- initial rbac
Features
User Management
As mentioned in the design docs, the Critical Stack UI introduces the User resource to represent
application users.
Overview
Users contain identifying information and some basic metadata:
apiVersion: criticalstack.com/v1alpha1
kind: User
metadata:
  # unique hash of email address
  name: sy3e5vknpktgkezpehh3rv76v5helr6vgnrm26feoz67stsosg6ef4jbdb2uegk
type: local
active: true
defaultNamespace: critical-stack
email: dev@criticalstack.com
username: Cluster Administrator
There are two flavors of user, determined by their type field:
localusers are created manually and log in with an email and passwordssousers are created "lazily" on first log in (see SSO) and do not have a password
When Dex authenticates an SSO user (creating the User resource if necessary), it attaches group information obtained
from the identity provider. These groups are used for matching role binding subjects when determining user
permissions.
Local user passwords are salted and hashed, stored as Secret resources in the critical-stack namespace. Users are
given role bindings that allow them to get and modify their own properties for the purpose of
changing profile data.
Creation
There are multiple ways to create a user. A local user may be created through the UI via the "Manage Users" screen,
under "Settings". During the creation process, an administrator can choose to assign a ClusterRole as a convenient way
to provide immediate access to the user. If a specific namespace is chosen, the ClusterRole is granted via a
RoleBinding in that namespace - otherwise "Cluster Wide" must be checked to indicate that a ClusterRoleBinding will
be created.

Any cluster roles with the label criticalstack.com/rbac=defaults will show up as options in this list, giving you a way to add
additional "canned" roles to the user creation process. The description is pulled from an annotation named
criticalstack.com/description.
Once created, all users and any corresponding (cluster) roles and bindings maybe found under "Cluster" > "Access Control".

The User Custom Resource should not typically be created directly - instead, create a UserRequest which will be
reconciled by the users controller (part of the UI deployment).
A simple UserRequest resource might look like:
apiVersion: criticalstack.com/v1alpha1
kind: UserRequest
metadata:
  # human-readable name
  name: admin
spec:
  template:
    type: local
    active: true
    defaultNamespace: critical-stack
    email: dev@criticalstack.com
    username: Cluster Administrator
The UserRequest's .spec.template field will become the properties of the created User object.
One key difference is that the name of the resource need not be a deterministic value derived from the email address. This makes it possible to create resources directly without access to the hashing function used (i.e. from within Helm templates).
In the above example the created user does not have a password set, meaning they will be unable to log in. The
UserRequest provides a couple of methods for setting an initial user password:
- For simple cases like local development, an initial password can be set on the user request itself:
# ...
spec:
  initialPassword:
    value: Winter20
  template: # ...
Note: that this will generate hashed password data from the provided plaintext password on initial user creation.
The password text remains in the UserRequest resource, but updating it will not change the created user's password.
Another method is to reference a secret, rather than embedding a plaintext password directly:
# ...
spec:
  initialPassword:
    secretRef:
      name: my-initial-password
      namespace: default
      key: ""        # field to read from secret data - if omitted, use the first
      consume: false # if true, remove the secret after generating password data
  template: # ...
The key and consume fields are optional to provide additional flexibility.
A user created via the UI or UserRequest CRD has a default ClusterRole and ClusterRoleBinding created for them,
allowing get, update, and patch actions on their UserRequest resource, as well as get on their User.
To disable this behavior, set .spec.skipUserBindings to true.
Note: all resources created by the UserRequest controller are owned by the UserRequest object - when deleted,
the User, password data Secret, and any created RBAC resources will be deleted.
Status
The UserRequest resource has a status subresource which indicates whether the corresponding User has been created by
the controller. The .status.user field is the name of the created user resource, while .status.conditions signals if the User is
ready. This allows for a process to depend on user creation:
kubectl wait userrequests admin --for condition=Ready
This functionality is used by our automated tests to ensure that a user is available before attempting to log in.
User Fields
The active property indicates whether a user can log in or not, and can be toggled from the user-management screen in
the UI:

Users have a default namespace, which will be their "landing page" upon login. From the "Settings" area of the UI, a user can change their default namespace, as well as upload an avatar or reset their password.
Permissions
See RBAC for an overview of the permission model used throughout the UI.
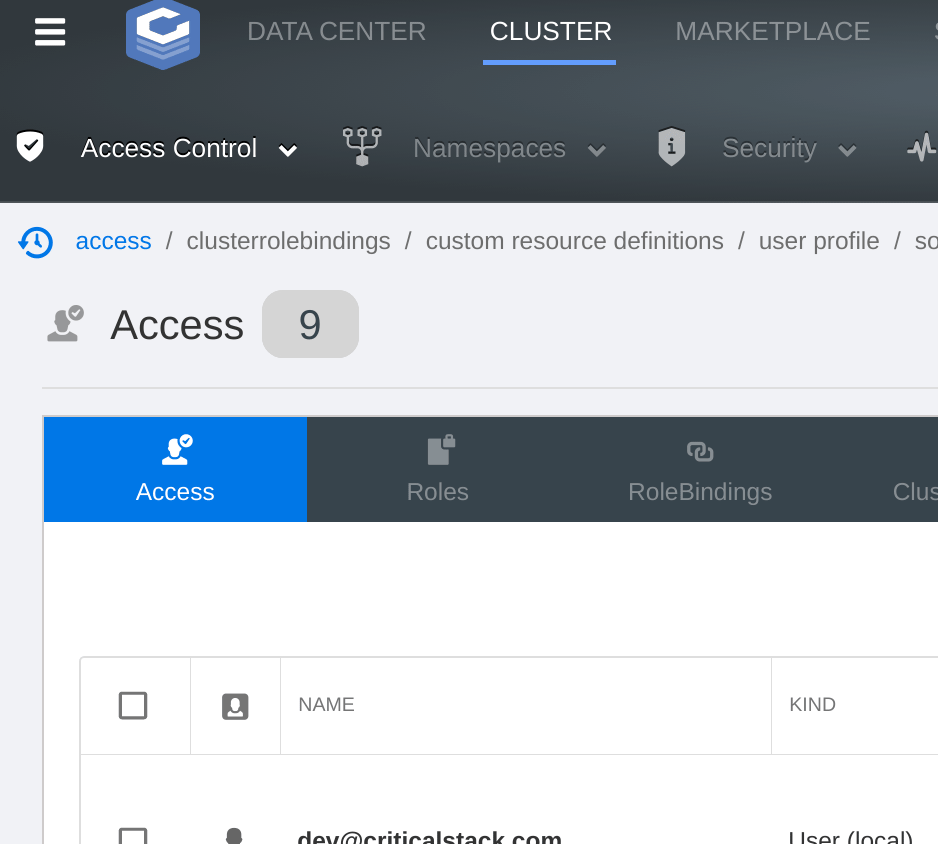
The access summary screen ("Cluster" > "Access Control" > "Access") displays an overview of User and Group subjects
that have bound roles and cluster roles:

Known users and groups will be listed here. By right-clicking a subject, you can quickly add additional role bindings and cluster role bindings for that subject.
Role Bindings and Cluster Role Bindings
When creating a role binding or a cluster role binding, note that you are not limited to subjects that show up in the selection dropdown - typing a name will allow you to create a new subject:

Roles and Cluster Roles
When creating roles and cluster roles, note that you are not limited to the API groups, Resources, and Verbs that show up in their respective selection dropdowns - typing in a new value will allow you to create a new group, resource, or verb.

Also note that when creating a new role, you can either start with selecting an API group and then the resources or by selecting a resource first and then the API group.

Initial Roles
Initial role bindings will be created on installation depending on the values passed to the UI Helm chart. See configuration for more information.
Marketplace
The Critical Stack Marketplace provides a repository of "building blocks" for application developers. It allows for easy access to premade kubernetes resources. The marketplace can be populated by adding sources, or by individually adding applications.
Overview
A marketplace application is a packaged "component" (a Helm chart wrapped in additional metadata) in the cluster's marketplace catalog. They are versioned, and can be installed by a user into a cluster namespace. Applications can be added individually or by adding a source. When a source is added, all applications under that source will be added to the marketplace when reconciled by the source controller (part of the UI marketplace deployment).
Marketplace Source Configuration
A source is any Helm repo that supplies metadata and assets (aka Helm charts) for one or more applications. Sources may be added to a cluster by a cluster administrator. This may be done via the UI or via the CRD.
Source Configuration via UI
A source may be added and configured through the UI via the "Sources" screen, under "Settings". When adding a source to the cluster, a unique name and the source URL are required. Optionally, the UI also provides the ability to configure a username and password for the sources that require it.

Source Configuration via CRD
A Source Custom Resource can be created to directly add a marketplace source to the cluster.
A simple Source resource may look like:
apiVersion: marketplace.criticalstack.com/v1alpha2
kind: Source
metadata:
  name: sample-source
  labels:
    created-by: dev-criticalstack-com
spec:
  url: 'https://charts.helm.sh/stable'
Marketplace Application Configuration
Applications with schema configurations (adding schema configurations) will need to have their configuration form completed and saved before being able to install the application.
If an application has schema configurations, the schema configuration form can be found under the application detail page. The application detail page may be accessed by selecting "Learn More" on the application tile cards. From this page, there are two methods for accessing the configuration form:
- directly selecting the "Configuration" tab
- clicking "Configure App" in the application card on the right side of the page

Marketplace Application Preview
By default, application previews are enabled and can be seen after clicking "Preview & Install App". Application previews can be disabled by toggling off "Include dry run". The application preview will show the resources the application will be deploy into the cluster without actually deploying the resources. The preview will also show the anticipated status of the resource and how deploying the resource will impact any existing resource limits and quotas. After seeing the preview, the user can choose whether or not to confirm the installation.

Marketplace Application Releases
An application may be installed multiple times. Each installation creates a new application release. All the installations (aka releases) for an application may be found in that application's app detail page under the "Installations" tab. Application releases may also be found under Data Center > Workloads > App Releases. This page will show all applications releases including the Helm chart installations that were not installed via marketplace.
Advance Configurations
Enabling/Disabling Marketplace
When enabled, the marketplace may be found on the top navbar in the UI. Marketplace is enabled when one or more sources or applications exists on the cluster. When all sources and applications are removed from the cluster, marketplace will be disabled and it will be removed from the UI.
Source Sync
The sync status of a source can be seen in the Marketplace Sources table under "Settings".

The interval for when a source will try to sync can be edited by modifying the updateFrequency value in the Source resource. By default, this value is empty so the source will not update.
# ...
spec:
  updateFrequency: 100ms
  # ...
A source can also be explicitly configured to not sync by setting the skipSync flag to true in the Source resource.
# ...
spec:
  skipSync: true
  # ...
Adding Applications Directly
Applications may be added directly by creating and applying an Application Custom Resource.
A simple Application resource may look like:
apiVersion: marketplace.criticalstack.com/v1alpha2
appName: sample
kind: Application
metadata:
  labels:
    marketplace.criticalstack.com/application.name: sample
    marketplace.criticalstack.com/source.name: demo
  name: demo.sample
versions:
- apiVersion: v1
  appVersion: 1.17.10
  description: Chart for the sample resource
  home: http://www.sample.org
  icon: # URL for the icon
  keywords: # ...
  maintainers: # email and name of this chart's maintainers
  removed: false
  sources: # optional URL to the source code of this chart
  urls: # URL to where this chart is stored
  version: 5.4.1
# ...
Application resources that are without a marketplace source can remove the source label: marketplace.criticalstack.com/source.name.
Editing Applications
After being added to marketplace, applications can be edited under their application detail page by selecting the "Edit" icon in the application card.

An application can be edited through the UI by selecting "Simple" edit. The user will first have to select a version of the application to edit before continuing. The user will be able to edit the application details (i.e. name, icon, application tags), documents, and configuration form.
Additional documents may be added in the "Edit Documents" section and will appear as additional pages in the application navigation tabs. Existing documents, except README.md, may also be removed from the application and subsequently from the navigation tabs.
Additional schema may also be added for configuration in the "Edit Configuration Form" section. A preview of the configuration form is shown to display how the form will look and to check for any validations. The user may also decide to exclude the schema - this will only remove the schema that the user may have added or changed and will revert the schema configuration form to the default one.
App Categories
Categories can be added to application to allow for marketplace to filter by category. They can be added via the UI under the application detail page by clicking the "Edit" icon in the application card and then selecting "Categories". Categories may also be applied by directly adding the respective labels to the application metadata. The category name will be part of the label key that maps to an empty value:
labels:
    marketplace.criticalstack.com/application.category.application.security: ''
    marketplace.criticalstack.com/application.category.cicd: ''
    marketplace.criticalstack.com/application.category.data.broker: ''
    marketplace.criticalstack.com/application.category.data.storage: ''
    marketplace.criticalstack.com/application.category.development: ''
    marketplace.criticalstack.com/application.category.information.security: ''
    marketplace.criticalstack.com/application.category.monitoring: ''
    marketplace.criticalstack.com/application.category.networking: ''
    marketplace.criticalstack.com/application.category.web: ''
Resource utilization metrics
The CS UI can display resource utilization metrics if a correctly configured Prometheus instance exists in the cluster.
The following examples show how to set up a either a standalone Prometheus, or a managed instance with Prometheus Operator.
Standalone Prometheus
A standalone Prometheus can be deployed using the official Helm chart and this sample values.yaml
Operated Prometheus
If a properly configured Prometheus Operator is running in the cluster already, a suitable instance can be deployed via CRD in the CS UI namespace with this configuration:
apiVersion: monitoring.coreos.com/v1
kind: Prometheus
metadata:
  name: prometheus
spec:
  tolerations:
    - effect: NoSchedule
      key: node.kubernetes.io/not-ready
      operator: "Exists"
    - effect: NoSchedule
      key: node-role.kubernetes.io/master
      operator: "Exists"
  additionalScrapeConfigs:
  - job_name: kubernetes-service-endpoints
    kubernetes_sd_configs:
    - role: endpoints
    relabel_configs:
    - action: keep
      regex: true
      source_labels:
      - __meta_kubernetes_service_annotation_prometheus_io_scrape
    - action: replace
      regex: (https?)
      source_labels:
      - __meta_kubernetes_service_annotation_prometheus_io_scheme
      target_label: __scheme__
    - action: replace
      regex: (.+)
      source_labels:
      - __meta_kubernetes_service_annotation_prometheus_io_path
      target_label: __metrics_path__
    - action: replace
      regex: ([^:]+)(?::\d+)?;(\d+)
      replacement: $1:$2
      source_labels:
      - __address__
      - __meta_kubernetes_service_annotation_prometheus_io_port
      target_label: __address__
    - action: labelmap
      regex: __meta_kubernetes_service_label_(.+)
    - action: replace
      source_labels:
      - __meta_kubernetes_namespace
      target_label: kubernetes_namespace
    - action: replace
      source_labels:
      - __meta_kubernetes_service_name
      target_label: kubernetes_name
    - action: replace
      source_labels:
      - __meta_kubernetes_pod_node_name
      target_label: kubernetes_node
  - job_name: kubernetes-services
    kubernetes_sd_configs:
    - role: service
    metrics_path: /probe
    params:
      module:
      - http_2xx
    relabel_configs:
    - action: keep
      regex: true
      source_labels:
      - __meta_kubernetes_service_annotation_prometheus_io_probe
    - source_labels:
      - __address__
      target_label: __param_target
    - replacement: blackbox
      target_label: __address__
    - source_labels:
      - __param_target
      target_label: instance
    - action: labelmap
      regex: __meta_kubernetes_service_label_(.+)
    - source_labels:
      - __meta_kubernetes_namespace
      target_label: kubernetes_namespace
    - source_labels:
      - __meta_kubernetes_service_name
      target_label: kubernetes_name
  - job_name: kubernetes-pods
    kubernetes_sd_configs:
    - role: pod
    relabel_configs:
    - action: keep
      regex: true
      source_labels:
      - __meta_kubernetes_pod_annotation_prometheus_io_scrape
    - action: replace
      regex: (.+)
      source_labels:
      - __meta_kubernetes_pod_annotation_prometheus_io_path
      target_label: __metrics_path__
    - action: replace
      regex: ([^:]+)(?::\d+)?;(\d+)
      replacement: $1:$2
      source_labels:
      - __address__
      - __meta_kubernetes_pod_annotation_prometheus_io_port
      target_label: __address__
    - action: labelmap
      regex: __meta_kubernetes_pod_label_(.+)
    - action: replace
      source_labels:
      - __meta_kubernetes_namespace
      target_label: kubernetes_namespace
    - action: replace
      source_labels:
      - __meta_kubernetes_pod_name
      target_label: kubernetes_pod_name
A full sample Prometheus Operator values.yaml is available here.. Note the relabeling configs.
Configure CS UI
To finish setting up resource metrics in the UI, set the Prometheus endpoint in the CS UI Helm values.yaml and deploy. The default value is http://prometheus-server:9090.
SSO
Because the Critical Stack UI utilizes Dex as its identity provider, enabling SSO is as simple as configuring Dex. We provide several convenient methods for accomplishing this task.
UI
Administrators can configure Dex connectors from the UI by visiting the "SSO Provider" menu under "Settings".
The "Connectors" section allows a user to create, edit, and delete existing connectors.
Note: by default an authproxy connector exists to connect the UI with Dex, which allows local users to download a
valid Kubeconfig.

When creating a new connector, selecting the type will allow you to enter the relevant configuration data for that
type - currently the UI supports creating GitHub, OIDC, and LDAP connectors via form - but more can be added upon
request.
Note: when creating a connector through the UI, the redirect URI will be auto-filled. In the case that it needs to
be changed, the path used should always be /dex/callback. In almost all cases, the full redirect URI should be
<user login URL>/dex/callback.
When more than one connector (excluding the authproxy) is present, the UI login screen will link to Dex's landing page
so that a user can choose the desired identity provider - rather than linking to the provider directly.
By right-clicking a connector and choosing "Set as default", it can be made to show up on the login screen even if there
are other choices available (avoiding the need for users to visit the Dex landing page). This is accomplished
by applying the label criticalstack.com/dex.default to the Connector resource.
Helm Values
Connectors can also be created at the time of chart installation by passing specific values to Helm. The
identity.connectors map provides this configuration data, for example:
identity:
  connectors:
    my-connector:
      name: MyConnector
      type: oidc
      config:
        issuer: https://my-connector.com
        clientID: my_client_id
        clientSecret: my_client_secret
        redirectURI: http://localhost:8000/dex/callback
        default: true
        anyOtherConfig:
        - added
        - here
    github:
      name: GitHub
      type: github
      config:
        clientID: my_client_id
        clientSecret: my_client_secret
        redirectURI: http://localhost:8000/dex/callback
The following connector resources (in addition to an authproxy) would be created:
kind: Connector
apiVersion: dex.coreos.com/v1
metadata:
  name: github
  namespace: critical-stack
  labels:
    criticalstack.com/dex.default: "true"
id: github
name: GitHub
type: github
config: eyJjbGllbnRJRCI6Im15X2NsaWVudF9pZCIsImNsaWVudFNlY3JldCI6Im15X2NsaWVudF9zZWNyZXQiLCJyZWRpcmVjdFVSSSI6Imh0dHA6Ly9sb2NhbGhvc3Q6ODAwMC9kZXgvY2FsbGJhY2sifQ==
---
kind: Connector
apiVersion: dex.coreos.com/v1
metadata:
  name: my-connector
  namespace: critical-stack
id: my-connector
name: MyConnector
type: oidc
config: eyJhbnlPdGhlckNvbmZpZyI6WyJhZGRlZCIsImhlcmUiXSwiY2xpZW50SUQiOiJteV9jbGllbnRfaWQiLCJjbGllbnRTZWNyZXQiOiJteV9jbGllbnRfc2VjcmV0IiwiaXNzdWVyIjoiaHR0cHM6Ly9teS1jb25uZWN0b3IuY29tIiwicmVkaXJlY3RVUkkiOiJodHRwOi8vbG9jYWxob3N0OjgwMDAvZGV4L2NhbGxiYWNrIn0=
Any values in the config property of a connector are directly marshaled to JSON and then base64 encoded.
kube-apiserver OIDC configuration
The kube-apiserver must be configured for OIDC for it to fully leverage the UI-Dex integration. This will allow Kubernetes RBAC to be tied to the OIDC grants returned by Dex.
The following arguments must be set on the kube-apiserver:
--oidc-issuer-url=https://<criticalstack-ui-url>/dex
--oidc-client-id=critical-stack
--oidc-username-claim=email
--oidc-groups-claim=groups
If the UI is being served with a non-root-trusted CA certificate (as in the auth-proxy config mentioned above), the CA will also need to be set:
--oidc-ca-file=/etc/kubernetes/pki/auth-proxy-ca.crt
If crit is used to bootstrap the cluster, these arguments can be provided in the crit ControlPlaneConfig as follows:
kubeAPIServer:
  extraArgs:
    oidc-ca-file: /etc/kubernetes/pki/auth-proxy-ca.crt
    oidc-client-id: critical-stack
    oidc-groups-claim: groups
    oidc-issuer-url: "https://<criticalstack-ui-url>/dex"
    oidc-username-claim: email
Check the full kube-apiserver argument reference here for more information.
Replacing Dex
TODO
- configuring a non-default sso provider
Machine API and Worker Management
The Critical Stack UI uses machine-api to manage the lifecycle of worker nodes in the cluster.
When running locally via cinder, machine-api (mapi) and machine-api-provider-docker (mapd) are installed automatically. From the "Nodes" screen, you will have the option to create a new worker node (i.e. a Docker container on your host) which will automatically join the cluster.
TODO:
- running with cinder and mapd
- gif
- running in aws
- worker configs
- dynamic configuration discovery
StackApps
Integration with the Critical Stack StackApps component.
- Requirements and Installation
- Verification/Signing Keys
- Drift detection
- StackValues
Planned Features
- Revision management
- StackValue configuration
Developer Shell
In addition to providing a shell interface for running pods, the Critical Stack UI enables developers to launch a
"developer shell" job quickly and easily - then attach to it. The default container image used is bitnami/kubectl,
allowing a user to interact with the cluster directly using familiar tools.
Permissions
The developer shell is launched, by default, in the current user's "default namespace". The container uses the default
Service Account in that namespace. If that service account has no roles bound to it, you will not be able to interact
meaningfully with the cluster using the credentials provided by the shell.
Persistence
A 1Gi persistent volume is created on demand when a user requests their first developer shell. The volume is mounted
as /data in the container, and intended to be used for persisting data across sessions (it could make sense to store a
user's home directory here).
Planned Features
- Customized base image
- Persistent history/home directory storage
- Choosing service account and role from the UI
Contributing
Link to developing locally.
Building
Tilt will build the necessary components automatically, but should you feel the need to do it yourself there are a
variety of make targets available:
$ make help

Usage:
  make <target>

Building
  build            Build client and server
  client           Build client code
  client-dev       Dev build of client code
  server           Build the go binary
  manifests        Generate CRD manifests
  image            Build and tag container images
  image-push       Push container images

Running
  cinder           Start and configure a cinder cluster for local development
  cinder-cleanup   Delete the cinder cluster

Testing
  test             Run go tests
  vtest            Run go tests with -v
  test-e2e         Run e2e tests
  lint             Lint codebase
  lint-full        Run slower linters to detect possible issues

Helpers
  clean            Cleanup the project folders
  help             Display this help
Testing
Unit Tests
Unit tests focus on individual pieces of logic - a single function - and don’t require any additional services to execute. They are a quick way to get the initial feel on the current implementation, but have the risk of integration bugs slipping through.
Unit tests are currently being developed using go test.
TODO: unit tests (and TESTS env var for focused testing)
- Setting
KUBEBUILDER_ASSETSin makefile (link to kubebuilder book on testing)
Controller Tests
Controller tests are the integration tests for Kubernetes controllers and focus on testing the behavior of an entire controller or the interactions between two or more controllers. The tests run on a test environment using envtest where one or more controllers are configured to run against the test cluster. This will allow the controllers to interact as if they are in a real environment by creating/updating Kubernetes objects and waiting for the controllers to take action.
Controller tests are currently being developed using ginkgo and gomega following the framework set up by Kubebuilder.
End-to-End Tests
End-to-end tests are used to verify that all components are working as expected in a realistic environment.
Currently, end-to-end tests are developed using go test and are placed under ./e2e/ in the repo.
E2E tests will require a local cluster be up and running with all the core Critical Stack components. This may be done using Tilt.
Cypress Tests
Cypress tests are end-to-end tests that use a web browser to simulate user insteraction with the UI.
They can be run inside the ./client/ folder with npx cypress open.
Running Tests
Tests may be run via Tilt or via the command line.
When running tests via Tilt, the Tilt UI can be used:

The test section will run both the unit tests and the controller tests while the test-e2e section will run the e2e tests. Each section may be rerun by clicking the refresh icon and can be seen by selecting the section in the sidebar.
When running the tests locally through the command line, the following make targets are used:
make test: Run all Go unit tests, including Kubernetes controller tests.make test-e2e: Run e2e tests in ./e2e/ on an existing cluster (based on KUBECONFIG).make lint: Run golangci-linter.
Note that when running the e2e tests locally, it needs a local server to be up and running. Whether or not Tilt is used to run the tests, it will still be used to deploy the server before running the tests.
Linting
Linting is used to analyze the source code to flag programming errors, bugs, stylistic errors, and any suspicious contructs.
golangci is currently used to lint the code.
The linter can be run in the command line by running make lint.
Documentation
This documentation is generated from markdown using mdbook.
Use the Makefile in the client/ directory to update and view docs.
$ cd client/
$ make build
The appropriate version of mdbook will automatically be installed to ./client/bin/mdbook.
To see a live-reloading preview of changes:
$ make serve
Open localhost:3000 to view your rendered pages.
Tips
there are probably some
Directory Structure
.
├── api         # Kubernetes CRD base types
├── bin         # Built executable binaries
├── chart       # The UI helm chart
├── client      # All client code and built code
├── cmd         # Go main-package code
├── controllers # Controllers for defined CRDs
├── docs        # Markdown documentation
├── e2e         # End-to-end tests
├── hack        # Files used in local development
└── internal    # Internal Go packages
Frequently Asked Questions
General:
- Ensure that docker is installed and that the docker daemon is running. Your
current user must have permission to interact with docker (e.g. you have the
dockergroup). - Sometimes you need to start fresh, run
make cinder-cleanupto delete your local cinder cluster.
How do I ...?
- Download A Kubeconfig
- The dropdown menu to the left of the Critical Stack logo contains a link to download a kubeconfig. See Dex for a visualization of downloading a kubeconfig.
- Change My Password
- To change your own password, navigate to the dropdown menu to the left of the Critical Stack logo and select "Settings". From the "User Profile" tab select "Password" and enter your old password and your new password. An administrator can change your password by selecting "Manage Users" in "Settings", right-clicking on your user, and selecting "Reset Password".
- Change My Default Namespace
- Navigate to the dropdown menu to the left of the Critical Stack logo and select "Settings". From the "User Profile" tab select "Change Default Namespace" and select your new default namespace from the dropdown menu.
- Change Section Editor Modes
- Navigate to the dropdown menu to the left of the Critical Stack logo and select "Settings". Under "User Interface" select "Section Editor". On this screen you can change the editor font size, the editor format (YAML or JSON), and the editor mode (vim or emacs).
- Change The Default Kubeconfig Template
- In the critical-stack namespace select Data Center, then navigate to "Config" -> "Config Maps". Right-click on kubeconfig-template and select "Edit".
- Add Marketplace Applications Directly
Why ...?
- hack/tools/bin
- websocket problems